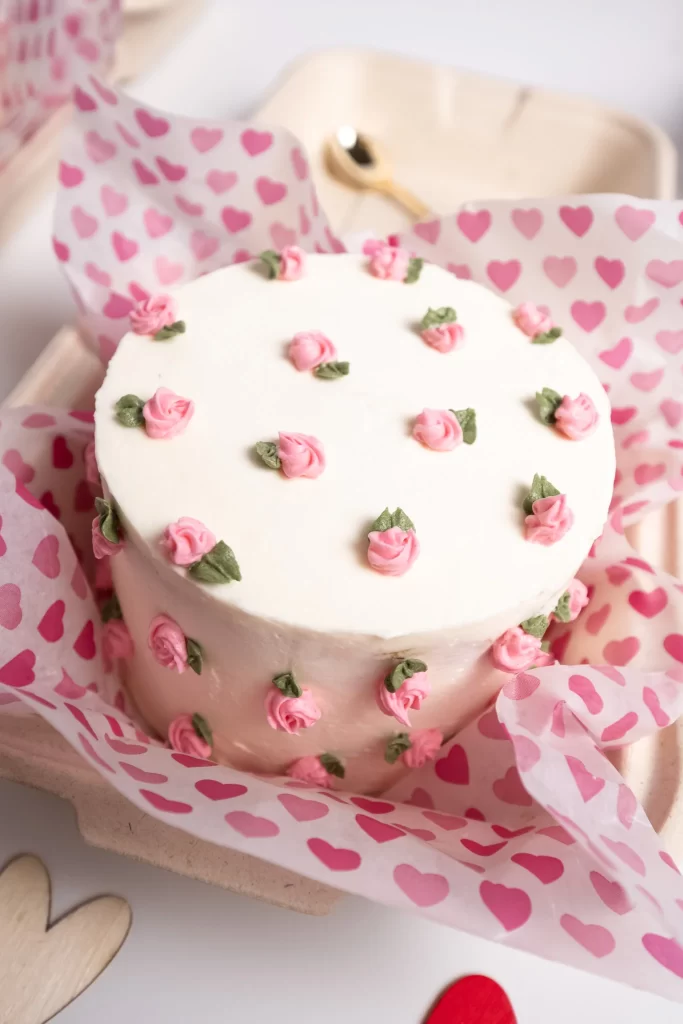
Bento Cakes are the perfect mini cakes for any special occasion. These adorable little cakes are filled and decorated in any way to create your own bento cake.
What is a bento?
A bento is a traditional Japanese lunchbox with compartments dividing the meats, veggies, rice, snacks, and desserts. Bento boxes are known for their aesthetic appeal and are often arranged with details.
So, what is a bento cake?
Think of a bento cake as a dessert version of those neat Japanese lunch boxes. Instead of rice and veggies, though, you have mini cake layers, various fillings, and maybe even some fresh fruits. And let's not forget these cakes are often decorated with super cute designs that'll make you go "aww" before you take a bite.
Bento cakes are also known as lunch box cakes that originated in South Korea. Korean bento cakes are often designed with cute quirky designs. They are packaged in take-out containers that make them the perfect lunchbox cakes.
Why make this bento cake?
My bento cake recipe is a vanilla cake that's just enough for one individual serving. Fill the layers of cake with a delicious jam or curd and then frost with a super light layer of frosting. To make this bento cake extra special personalize a sweet message on the cake for the perfect gift.
Bento Cake Ingredients:
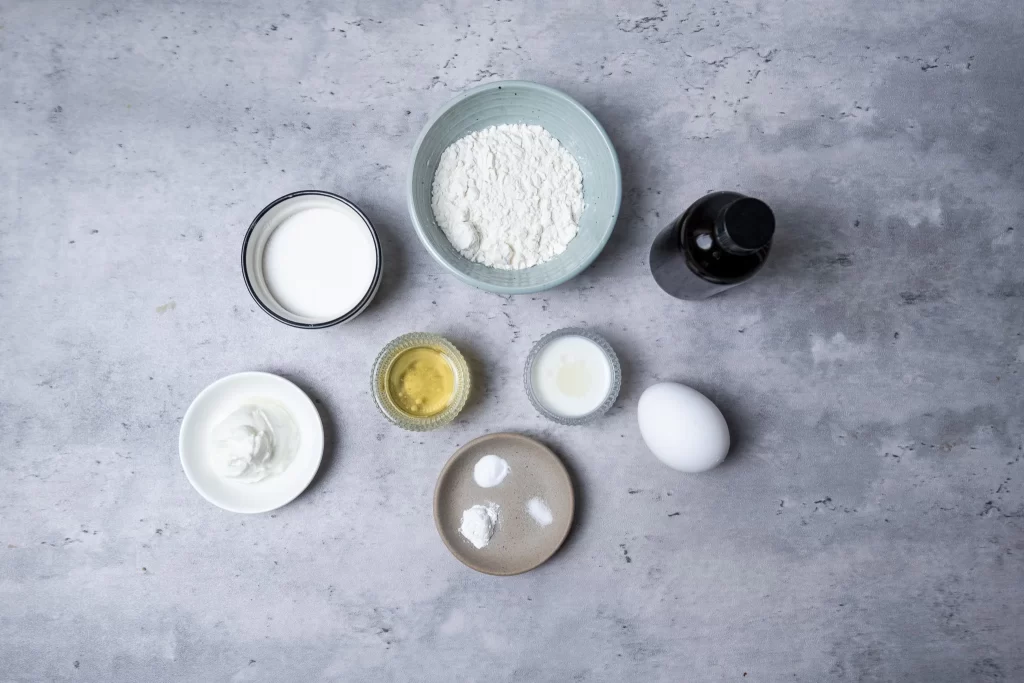
- Flour: All Purpose flour
- Baking Powder/Baking Soda: Helps lift the cake to create a tender texture cake.
- Milk: Hot milk is added at the end to create a tender and moist cake
- Sugar: Sugar provides sweetness and moisture in the cake. Don't reduce the amount of sugar in the cake to reduce the sweetness.
- Oil: Flavorless oil is recommended like canola and vegetable oil.
- Egg: I always use large eggs when baking. This recipe calls for half of a large egg.
- Sour Cream: Provides the cake with extra moisture. Full-fat Greek yogurt can also be substituted.
Buttercream:
- Butter: Only real butter here, no margarine or shortening.
- Powdered Sugar: It's also called confectioner's sugar, used to sweeten the buttercream.
- Fillings of Choice: Jams, curds, fruits
What tools do I need to make a bento cake?
- Offset spatula
- Piping bag or ziploc bag
- Silicone 4 in cake pans or 4 inch cake rounds
- Bench scraper
- Mini utensil
- Washi tape
- 1 small takeout box
- Colorful twine
How to make Bento Cake:


Preheat Oven to 350F.
Grease and line a 4in round baking pan with parchment paper and set aside. If using a silicone mold, then just rinse and dry the silicone mold because of dust build up.
In a medium-sized bowl add all the wet ingredients except the milk (half whisked egg, oil, sour cream, vanilla extract, sugar). Mix it all in until it comes together. Add in the flour, salt, baking powder, and baking soda. Whisk all the ingredient just until the wet combines with the dry.
In a microwave-safe cup heat up the milk until it's hot and then add it to the cake batter. Scrape the sides of the bowl and mix until all the ingredients are combined. The batter should not be runny but it's also not very thick either. Bake the cake batter in the prepared pan. This recipe provides me with 3 4-inch cake layers if baking in the silicone mold.
Time will be determined based on the pan you decide to use.
Bake the mini cakes for 8 to 10 minutes checking the sides and top of the cake for doneness.
Allow the cakes to fully cool and make the buttercream.
In a large size bowl add in the butter and cream on high for 4 minutes. Add in the vanilla and powdered sugar and continue to beat for another 2 to 3 minutes on high and then add in the milk to thin the consistency out.
Assemble and Decorate


Once the cake layers have cooled assemble the cake for decorating.
Cut out an 8x8in parchment paper and place it on your decorating stand. Place one of the layers in the middle of the parchment paper.
With an offset spatula or spatula of choice spread some buttercream in the middle of the layers. If a filling is desired, fill a piping bag with buttercream and then pipe a border of buttercream on the inner edges of the cake and then fill and spread the filling and then place the next layer on top. Repeat if a third layer is desired.
Apply a thin layer of buttercream outside of the cake to create the crumb coat. Set the cake in the fridge for at least 20 minutes or until the outside of the buttercream is firm to the touch. Frost the outside of the cake and then use a bench scraper to straighten the sides. Pipe and decorate the cake as desired.
Bento Cake FAQS:
Can I still make a bento cake without the cake pan?
Of course! A bento cake is just a small cake that is usually 4 inches in size. If you don't have a cake pan you can bake it into a sheet cake or a half-sheet pan. Using a round cookie cutter cut the sheet cake into little round small cakes. You would have to double or triple this recipe a couple of times if you wanted to bake it into a sheet cake. I would recommend using my chocolate cake recipe, carrot cake but baking them into sheet cakes.
I found a 4in cake round silicone mold that I used to make this bento cake that made it much easier too (linked at the top with equipment)
Can't find a small takeout box.
If you can't find a small take-out box you can also use a 4-count cupcake box. Cut the inside of it out and place the bento box cake in the middle.
Decorating Tips:

Sprinkles/ fruits/ candy: These are great things to use to decorate the top of the cake
Colored frosting: I always use gel food coloring when it comes to coloring buttercreams (Sunnyside from Hobby Lobby).
Colored white chocolate: Chocolate is a great way to create designs that will dry and harden to use for cake decor. If coloring the white chocolate make sure to use an oil-based food coloring (Colourmill oils is a great brand).
Add a little message: Pipe cute messages on the top of the cake. (Check out my social media for a cute way to hide a hidden message on the cutest little cakes)
If you've made this bento cake please tag me @Ofjensweets! Bento cakes are the perfect size cakes perfect for any kind of celebration!
Simple Bento Cake for One
Ingredients
- 2 tablespoon Oil neutral
- ¼ cup Sugar
- ½ large Egg whisked
- 1 tablespoon Sour cream room temp
- ½ teaspoon Vanilla extract
- ⅓ cup All purpose flour
- ¼ teaspoon Baking powder
- ⅛ teaspoon Baking soda
- pinch Salt
- 2 tablespoon Milk hot
Buttercream Frosting
- ½ cup unsalted butter room temp
- 1 ¼ cup powdered sugar
- 1 teaspoon vanilla extract
- 1 tablespoon milk
Instructions
- Preheat Oven to 350F.
- Grease and line a 4-inch round baking pan with parchment paper and set aside. If using a silicone mold.
- Add all the wet ingredients except the milk (half-whisked egg, oil, sour cream, vanilla extract, sugar) in a medium-sized bowl. Mix it all in until it comes together. Add in the flour, salt, baking powder, and baking soda. Whisk all the ingredients together just until the wet combines with the dry.
- In a microwave-safe cup heat the milk until it's hot and then add it to the cake batter. Scrape the sides of the bowl and mix until all the ingredients combine. Bake the cake batter in the prepared pan.
- Bake the mini cakes for 8 to 10 minutes checking the sides and top of the cake for doneness.
- Allow the cakes to fully cool and make the buttercream.
- In a large size bowl add in the butter and cream on high for 4 minutes. Add in the vanilla and powdered sugar and continue to beat for another 2 to 3 minutes on high.
Cake Assembly and Decorating
- Once the cake layers have cooled assemble the cake for decorating.
- Cut out an 8x8in parchment paper and place it on your decorating stand. Place one of the layers in the middle of the parchment paper.
- With an offset spatula or spatula of choice spread some buttercream in the middle of the layers. If a filling is desired, fill a piping bag with buttercream and then pipe a border of buttercream on the inner edges of the cake and then fill and spread the filling, and then place the next layer on top. Repeat this step if a 3rd layer is desired.
- Apply a thin layer of buttercream outside of the cake to create the crumb coat. Set the cake in the fridge for at least 20 minutes or until the outside of the buttercream is firm to the touch. Frost the outside of the cake and then use a bench scraper to straighten the sides. Pipe and decorate the cake as desired.
Recently In My Kitchen Recipes:

